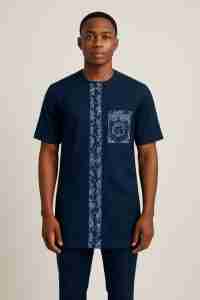
Looking for how to customise a shirt with ankara fabric? But have you ever looked at a plain shirt in your wardrobe and thought, “This shirt would look way better with a touch of Ankara?” You’re not alone.
These days, everyone seems to be looking for ways to add a bit of African flair and personal touch to their outfits. And interestingly, Ankara fabric is one of the easiest ways to do that. Ankara isn’t just about fashion anymore; it’s about expression, culture, and creativity.
Starting from customised Ankara styles for weddings to casual hangouts, people are proudly mixing Ankara prints with modern fashion pieces. And the fun part? You don’t need to be a fashion designer to customise a shirt with Ankara fabric. With a bit of creativity and some patience, you can easily transform that boring shirt in your closet into something that screams style and personality.

How to Customise a Shirt with Ankara Fabric
Customising a shirt with Ankara is not just about sewing patches; it’s about creating a unique piece that reflects you. Even if you’re trying to make a fashion statement, promote African culture, or simply repurpose old clothes, we are here to help you.
Step-by-step Guide: How to Customise a Shirt with Ankara Fabric
This guide will walk you through the whole process — step by step — in a simple, fun, and relatable way.
Step 1: Choose the Right Shirt
Before you even touch the Ankara fabric, the first step is choosing the right shirt to customise. You can use either a plain T-shirt, polo, or even a button-up shirt.
But here’s the trick — the simpler, the better. Shirts in solid colours like white, black, navy blue, or grey work best because they allow the Ankara patterns to pop.
If the shirt already has too many designs or patterns, the Ankara might clash and make it look too busy. So, go for something minimal and plain. Cotton shirts are a great choice because they are easy to work with, comfortable, and they hold fabric glue or stitching nicely.
Also, check that the shirt still fits you well. There’s no point customising a shirt that’s too tight or too loose. If you’re repurposing an old shirt, wash and iron it first so it’s clean and ready to go.
Step 2: Pick the Perfect Ankara Fabric
Now, this is where the fun begins. Ankara fabrics come in countless colours, prints, and patterns. When picking your Ankara, try to choose one that complements the colour of your shirt.
For instance, if your shirt is white, you can go bold with bright and loud Ankara patterns. But if your shirt is black or navy blue, go for Ankara with hints of gold, red, or orange. It has to be something that stands out but still looks classy.
If you’re not sure what will look good, you can lay the Ankara on top of the shirt to see how the colours blend together. Also, pay attention to the fabric quality — 100% cotton Ankara is best because it’s soft, durable, and easy to sew or glue.
Pro tip: Buy a small piece (like half a yard) if you’re customising just one shirt. That’s more than enough for small designs like collars, pockets, or sleeve patches.
Step 3: Gather Your Tools
You don’t need a full tailoring setup to customise your shirt. Here’s a short list of things you might need:
- A pair of scissors
- Needle and thread (or a sewing machine if you have one)
- Fabric glue (optional, for those who don’t want to sew)
- Measuring tape or ruler
- Pins or chalk (for marking)
- Iron (to smoothen the fabric and set your work)
Having your tools ready before starting helps you work faster and prevents mistakes.
Step 4: Plan Your Design
This is the creative part. It’s about deciding where to place your Ankara fabric. There are no strict rules here, so feel free to experiment. Some common ideas include:
- Adding Ankara to the shirt collar and cuffs for a classy touch.
- Designing an Ankara pocket on a plain shirt.
- Creating a strip down the button line of a button-up shirt.
- Then using Ankara patches around the shoulders or sleeves for a more youthful and trendy vibe.
Even creating a half-and-half design, where one side of the shirt has Ankara patterns and the other remains plain.
Whatever design you pick, make sure it’s balanced. Don’t overcrowd the shirt cos sometimes, less is more.
If you’re new to this, sketch your design on paper first or use chalk to mark where the fabric will go. That way, you’ll have a clear picture of the final look before cutting your fabric.
Step 5: Cutting and Preparing the Ankara
Once your design is set, it’s time to cut the Ankara fabric. Spread the fabric on a flat surface and use your measuring tape or ruler to mark the shapes you need.
Always leave about half an inch extra around your markings. I mean that extra bit is your seam allowance, which you’ll need for sewing or gluing the fabric neatly.
After cutting, use an iron to press the Ankara pieces. This will remove any wrinkles and make them easier to handle. If you’re using fabric glue instead of stitching, ironing also helps the fabric stick better later on.
Step 6: Attach the Ankara to the Shirt
Now comes the real deal which is attaching the Ankara to your shirt. You can either sew or glue it, depending on what you’re comfortable with.
If you’re sewing:
- Pin the Ankara piece to the shirt so it stays in place.
- Stitch along the edges carefully. If you’re using a needle and thread, small neat stitches work best.
- Make sure you secure the corners properly to avoid fraying.
If you’re using fabric glue:
- Apply a thin layer of glue on the back of the Ankara piece (don’t overdo it, or it’ll soak through).
- Press it firmly onto the shirt.
- Iron it gently with a warm setting to help it stick better.
- Let it dry completely before wearing or washing.
Whichever method you choose, take your time. Rushing can make the design look uneven or messy.
Step 7: Finishing Touches
Once the Ankara is attached, iron the shirt again to smooth out any folds. Check that the edges are secure and no part of the fabric is lifting. If needed, trim off any loose threads.
You can also get creative by adding little extras like buttons covered in Ankara fabric or matching Ankara patches on other clothing items, like your jeans or cap. That gives your whole outfit a coordinated and stylish look.
Step 8: Caring for Your Customised Ankara Shirt
Now that your Ankara shirt is ready, you need to take good care of it so it lasts long. Here are some quick tips:
- Wash gently with mild soap and cold water.
- Avoid using bleach or harsh detergents.
- Turn the shirt inside out when washing or ironing to protect the fabric design.
- Hang to dry rather than using a dryer, especially if you used fabric glue.
You should know that proper care ensures that your Ankara stays bright and your design remains neat even after several washes.
Final Notes
Customising a shirt with Ankara fabric is one of those little DIY fashion hacks that can completely change your style game. It’s affordable, creative, and fun. You don’t have to be a professional tailor; just a bit of imagination, a steady hand, and a love for vibrant prints.
The best part? Every shirt you customise becomes one of a kind. No one else in the world will have that exact same design.
So next time you’re bored with your old shirts, don’t throw them away. Pick up some beautiful Ankara fabric and give them a fresh new look. Whether it’s for everyday wear, an event, or just to showcase your creativity. The truth is that Ankara customisation will always make your outfit stand out beautiful as you.
I hope this article was helpful. You are free to drop your questions in the comments section below.
 WhatsApp